
Language
Views: 0 Author: Site Editor Publish Time: 2026-07-04 Origin: Site


Investing in a night vision device requires serious research and disciplined planning. Marketing hype often masks true field performance. Buyers risk overpaying for unnecessary specifications while ignoring critical foundational gear. They also frequently under-budget for essential mounting and integration hardware. You need clear, objective facts before spending thousands of dollars. We built this guide to offer a strictly technical framework. You will learn to evaluate tube performance accurately. We will help you match form factors to your specific operational environment. You will discover how to avoid common procurement pitfalls. Whether tracking hogs at distance or running dynamic close-quarters drills, right-sizing your gear remains crucial. Let us cut through the noise. We will examine the data you actually need to make an informed choice.
Application Drives Form: Tactical movement requires helmet-mounted binocular or monocular setups, while static hunting often favors a dedicated night vision scope or thermal hybrid.
FOM is Not the Only Metric: Figure of Merit (FOM) matters, but Signal-to-Noise Ratio (SNR) and autogating capabilities are equally critical for real-world clarity.
Digital vs. Analog Reality: Digital night vision offers a budget-friendly entry point but inherently suffers from latency and IR-illuminator dependency compared to analog Gen 2+ or Gen 3 tubes.
Total Cost of Ownership: The optic is only 60-70% of the cost; mounts, helmets, and IR lasers make up the rest.
You must define your operating environment before looking at specification sheets. Different applications require entirely different optical capabilities. Tactical users need vastly different gear than static observers.
Tactical environments demand dynamic movement in close quarters. Operators prioritize spatial depth perception and a wide Field of View (FOV). Zero-latency analog systems are mandatory here. You cannot rely on lagging digital screens while moving fast. For form factor, you typically choose helmet-mounted setups. Dual-tube binoculars offer superior situational awareness. Versatile monoculars like the PVS-14 remain reliable, cost-effective alternatives. Lighting conditions shift rapidly in these scenarios. You might move from bright urban streetlights to pitch-black interior rooms. Autogating technology becomes non-negotiable. It automatically throttles power to protect the tube from sudden light bursts. This ensures continuous visibility without blinding the user.
Hunting and pest control focus heavily on static observation. You prioritize target identification over fast, dynamic movement. Magnification proves essential for taking ethical, accurate shots. Recognition range matters far more than a wide peripheral field of view. Standard tactical goggles offer only 1x magnification. For form factor, clip-on systems work exceptionally well. Alternatively, you might mount a dedicated night vision scope directly to your rifle rail. This acts as your primary hunting scope during nighttime operations. Lighting assumptions differ significantly in the woods. Deep forests or open fields provide consistent ambient light. You can comfortably rely on supplementary active IR illuminators. Target animals rarely detect these invisible infrared beams.
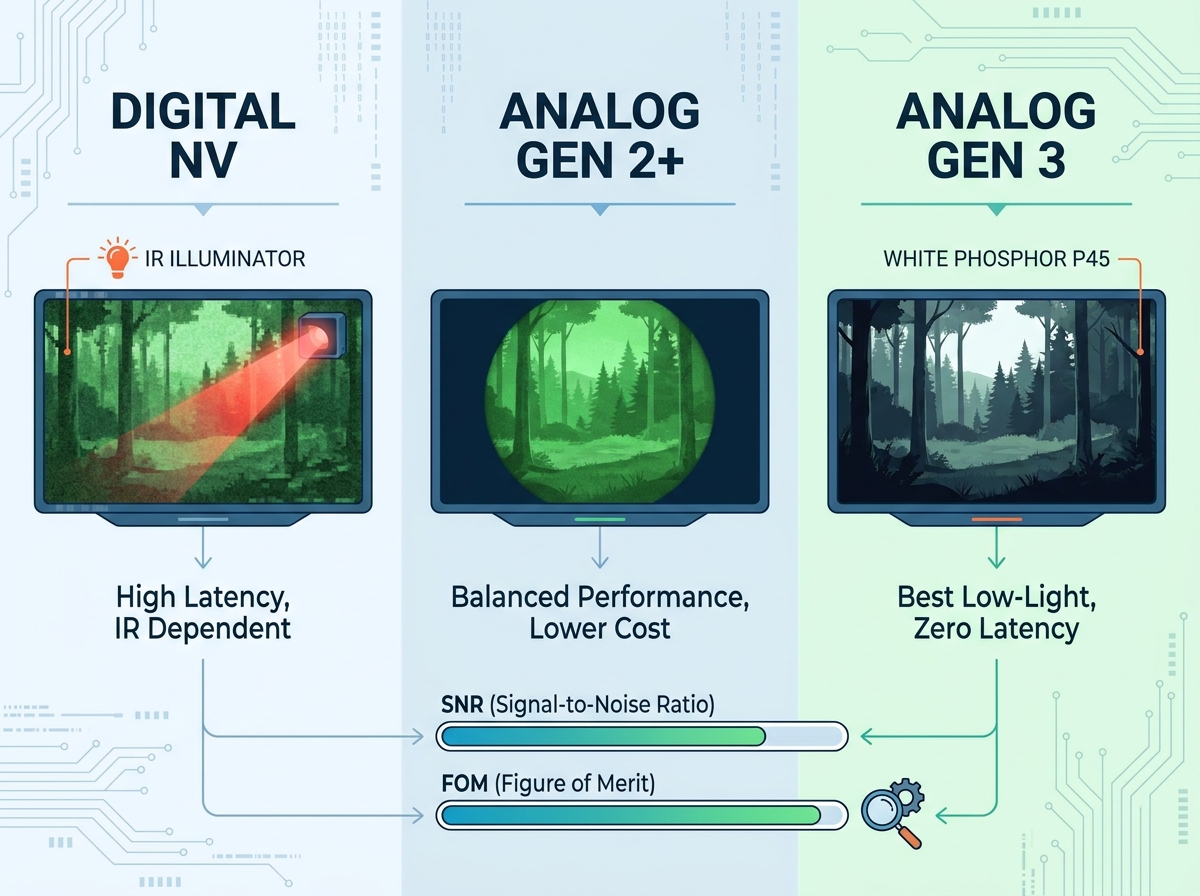
Technology tiers dictate both price and performance. You must understand how these systems amplify light. Modern options range from basic digital sensors to military-grade analog tubes.
Digital night vision represents the budget baseline for beginners. Modern sensors provide low-cost entry points. They remain completely safe for daytime observation. Direct sunlight will not damage a digital sensor. Most digital units offer easy onboard video recording. However, digital systems carry inherent operational flaws. Digital processing creates noticeable screen latency. This millisecond delay makes fast movement dangerous and disorienting. Walking over uneven terrain becomes hazardous. Furthermore, digital optics heavily rely on active IR illumination. You must shine an infrared flashlight to see anything clearly. This active beam acts as a massive beacon. Anyone wearing night vision goggles will spot your position instantly.
Gen 2 and Gen 2+ hit the true sweet spot for most users. They deliver a massive leap over legacy Gen 1 units. Gen 2 introduces the microchannel plate (MCP). This internal plate multiplies electrons incredibly efficiently. You get highly usable light amplification without heavy edge distortion. Modern Gen 2+ tubes perform exceptionally well in the field. Brands like Photonis produce tubes rivaling older Gen 3 models. They excel specifically in urban areas or high-moonlight environments. They offer professional-grade clarity at a moderate price point.
Gen 3 sets the absolute professional standard. These tubes utilize advanced gallium arsenide (GaAs) photocathodes. They remain unmatched in extreme low-light conditions. You will notice the massive difference under deep tree canopies. We must also compare filmless versus thin-film designs. Filmless tubes offer ultimate light transmission. They capture the absolute maximum number of photons possible. Thin-film tubes incorporate a microscopic ion barrier. This barrier slightly reduces overall light transmission. However, it vastly increases long-term durability. It protects the sensitive internal tube against heavy weapon recoil.
Manufacturers throw many complex numbers at prospective buyers. You must decode these specification sheets carefully. Four core metrics truly dictate your final image quality.
Many buyers obsess over Figure of Merit. FOM serves as the industry standard baseline calculation. You calculate it by multiplying Resolution by SNR. A high FOM suggests strong overall optical performance. However, a high FOM does not guarantee a flawless tube. The math completely ignores physical blemishes or dark spots. A high-FOM tube might still feature terrible center-zone spots. We advise looking deeper into the specific data sheet.
Signal-to-Noise Ratio dictates true low-light clarity. It acts as the ultimate indicator of performance. SNR measures actual signal strength against background electrical noise. Higher SNR means less visual static in your image. We call this static scintillation. Low scintillation allows you to see finer details in deep shadows. A tube boasting an SNR above 30 provides incredible, professional-grade clarity.
Resolution determines physical edge sharpness. Manufacturers measure it in line pairs per millimeter (lp/mm). High resolution helps you identify small, distant details. However, human eyes experience steep diminishing returns past 72 lp/mm. Pushing past this specific number rarely yields noticeable field improvements. Paying premium prices for 81 lp/mm often wastes your budget.
Phosphor chemistry fundamentally changes your viewing experience. Traditional tubes use P43 green phosphor. Green matches the peak sensitivity of the human eye. It causes significantly less eye fatigue over long observation stakeouts. Many seasoned professionals still prefer green. White phosphor uses modern P45 chemistry. It produces a pale blue-white image. White phosphor dominates modern tactical preferences. The human brain processes high-contrast black-and-white images faster. It identifies shadows and complex edges naturally.
Metric | Definition | Field Impact |
|---|---|---|
FOM | Resolution multiplied by SNR | Provides a quick baseline for tube quality. |
SNR | Signal strength relative to noise | Determines performance in extremely dark conditions. |
Resolution | Measured in line pairs per millimeter (lp/mm) | Dictates the sharpness of physical details. |
Phosphor | Chemical coating color (Green or White) | Affects contrast, depth perception, and eye fatigue. |
Choosing the correct optic is only the first step. You must implement it effectively onto your gear ecosystem. Users face crucial decisions regarding ergonomics and mounting hardware.
A monocular setup proves highly cost-effective. It keeps your unaided eye dark-adapted naturally. Monoculars remain lightweight and pack away easily. However, they slow down your brain's processing speed. Fast movement and driving become significantly harder. Binocular systems utilize dual intensifier tubes. They provide superior spatial depth perception. Moving quickly through structures requires this natural depth. They do carry a high physical weight penalty. They also double your initial optic cost. You can view advanced dual-tube examples like these night vision goggles to understand the larger form factor.
Helmet ecosystems require significant foundational investment. You cannot strap an expensive tube to cheap plastic. A rigid bump helmet provides the necessary foundation. A ballistic helmet offers superior protection but adds severe weight. Optics sit far forward on your head. They create heavy frontal torque. Your neck muscles will fatigue quickly without balance. You must install a proper counterweight pouch on the rear. Counterweights balance the helmet perfectly. You will also need a rock-solid mount. Bayonet mounts slide in but often rattle loudly. Dovetail mounts lock up incredibly tight. We highly recommend articulating dovetail bridges. They allow you to stow dual tubes flat against the helmet. This reduces your overhead profile and prevents doorframe snagging.
Shooters often try mounting headgear directly behind daytime optics. We strongly advise against this practice. Standard analog goggles lack heavy internal shock mitigation. Repeated rifle recoil shatters delicate glass components. You will destroy a sensitive image intensifier quickly. Instead, use an infrared aiming laser on your rifle rail. You keep the goggles strapped safely to your helmet. You look over the rifle and aim via the laser beam. We call this passive or active laser aiming. If you must look through an optic to shoot, change platforms. Switch to a dedicated thermal sight or heavy-duty weapon sight. Dedicated scopes feature thick internal potting. They absorb recoil safely.
Procuring analog tubes introduces specific industry risks. You must navigate technical specifications and strict legal regulations carefully. Buying blindly often leads to wasted money.
You must evaluate tube blemishes carefully before buying. Factory spec sheets detail these permanent dark spots. Manufacturers divide the viewing screen into three concentric zones. Zone 1 represents the direct center of your vision. Zone 2 surrounds the center ring. Zone 3 covers the extreme outer edges. Imperfections during manufacturing create tiny black spots. A Zone 3 blemish rarely impacts field operations. Your brain naturally tunes it out quickly. Accepting a Zone 3 spot saves you hundreds of dollars. Conversely, a Zone 1 spot blocks your immediate focal point. We consider any Zone 1 blemish a complete dealbreaker. You should never compromise on center-tube clarity. Always request specific tube photographs before purchasing.
Buyers must understand strict legal export regulations. The United States enforces ITAR restrictions rigorously. Gen 3 systems and high-FOM tubes fall under strict export control. They cannot legally leave the country. You must secure official State Department authorization first. Never attempt to travel internationally with regulated optics. Violating ITAR carries severe federal penalties.
Gray market purchasing carries massive financial risks. Avoid buying re-potted tubes from unknown basement builders. Avoid surplus tubes lacking official factory documentation. Gray market units rarely carry valid, enforceable warranties. You might purchase a dying tube masquerading as new. Always demand a factory data sheet before sending funds. Legitimate dealers provide robust warranty support and clear technical specs.
Selecting the proper equipment requires disciplined decision-making. Marketing metrics should never override actual field requirements. Here are the core action steps to follow as you prepare your gear:
Start by defining your strict operational budget before browsing models.
Identify your primary environment to dictate monocular versus binocular needs.
Select Gen 2+ or Gen 3 analog tubes based on ambient light realities.
Allocate adequate funds strictly for mounts, helmets, and infrared accessories.
Review specific factory data sheets and blemish photographs before purchasing.
Take time to evaluate your current gear ecosystem. Check your existing helmet setup for load-bearing compatibility. Measure your available rifle rail space. Secure your mounting hardware before ordering the final optic. Proper preparation ensures immediate field readiness upon delivery.
A: You should never expose analog tubes to daylight. Direct sunlight permanently burns the image intensifier tube. It ruins the expensive photocathode material instantly. Even brief exposure degrades overall lifespan. Conversely, digital systems process light through a camera sensor. Digital units remain completely safe for daytime observation.
A: Helmet-mounted goggles work best for situational awareness and moving. You pair them with an infrared laser on the rifle for fast aiming. A dedicated scope works better for static, precise shooting at distance. Dedicated scopes handle heavy rifle recoil safely, whereas helmet-mounted tubes often lack required shock resistance.
A: The value depends entirely on your environment. Gen 3 tubes excel in extreme low-light environments. Deep woods with heavy canopy cover demand Gen 3 performance. However, high-spec Gen 2+ tubes perform exceptionally well in suburban areas. If you hunt under moonlight or urban glow, Gen 2+ offers incredible value.
A: Modern analog tubes typically boast a 10,000-hour lifespan. Most users never reach this degradation limit during normal operational use. Tube dimming happens incredibly slowly over decades. In reality, power-supply electronics fail long before the physical tube degrades. Always handle your units gently to protect internal connections.


