Language
Views: 0 Author: Site Editor Publish Time: 2026-05-06 Origin: Site


Navigating the consumer night vision market in 2026 feels like walking through a minefield of confusing specifications and extreme price tags. You will find everything from cheap $150 plastic digital units to complex $10,000 military-grade setups. Beginners frequently purchase the wrong device because they misunderstand the vast differences between military-spec analog tubes and commercial digital sensors. Buying the wrong gear not only wastes money but can also create severe safety hazards during nighttime movement. This guide bypasses flashy marketing hype to give you a practical, evidence-based evaluation framework. We cover critical terminology, compare technology types, and break down budgeting realities. You will also learn about the hidden costs of mounting accessories to ensure you make a regret-free first purchase.
True "goggles" require 1x magnification for safe movement; magnified devices are technically binoculars and are dangerous for walking or driving.
Digital night vision is the most cost-effective entry point for casual users, while analog (Gen 2/3) monoculars remain the standard for serious tactical and hunting applications.
The device is only 50% of the cost—budgeting must include helmets, specialized mounting arms, and counterweights to make the system usable.
Beware of "too good to be true" deals; always verify tube blemishes and demand through-the-tube photos before purchasing used analog units.
Many buyers start their research by searching for Night Vision Goggles. However, they often actually need a completely different type of device. The industry uses specific terminology, and confusing these terms leads to poor purchasing decisions.
True goggles are designed specifically for hands-free operation. They strictly feature 1x magnification. If a device has optical magnification (like 3x or 5x), it distorts your depth perception. Magnification causes extreme disorientation if you wear the unit while moving. Imagine looking through binoculars while trying to walk down a flight of stairs. You will likely fall. Magnified units are technically binoculars or spotting scopes, not goggles.
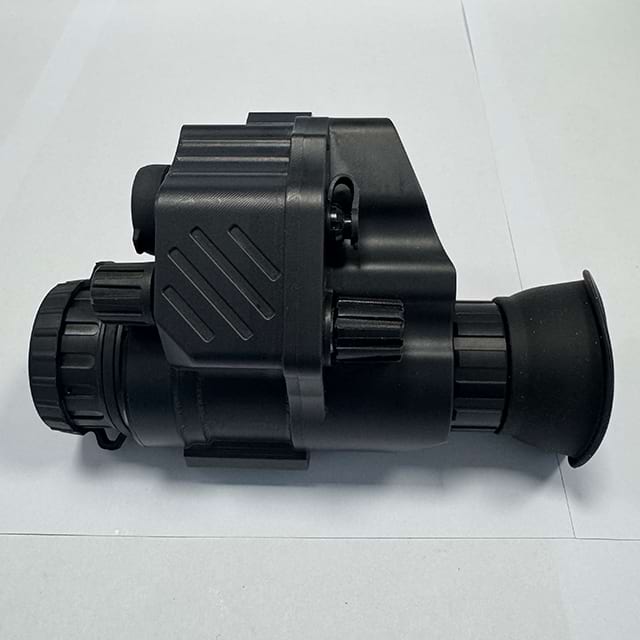
We heavily recommend a single-tube setup, known as a monocular, for beginners. The PVS-14 is the most famous example of this configuration. Starting with a monocular offers massive advantages.
The Safety Factor: A monocular leaves one eye exposed to ambient darkness. This allows your brain to maintain natural depth perception. You keep full situational awareness while navigating complex terrain.
The Cost Factor: A single tube literally halves your entry price compared to dual-tube setups. You get top-tier performance without paying for two image intensifiers.
You must differentiate between bioculars and binoculars. A biocular uses a single intensifier tube but splits the image to both eyes. The PVS-7 is a classic biocular. It looks cool, but it blocks your natural vision and prevents you from aiming a rifle passively. True binoculars use two independent tubes, giving each eye its own image. This provides excellent depth perception but costs twice as much.
Understanding the fundamental technology inside your device is critical. You must choose between commercial digital sensors and traditional analog tubes. Each serves a very different user base.
Digital units use CMOS sensors similar to those in digital cameras. They rely heavily on active 850nm or 940nm infrared (IR) LED illuminators to light up the dark.
Pros: They are highly affordable. You cannot damage them by exposing them to daylight. They offer built-in recording capabilities. Many modern units are rechargeable via USB-C, saving you from buying endless batteries.
Cons: Active IR emission is a massive drawback for tactical use. To anyone else wearing night vision, your IR illuminator looks like a blazing flashlight. Digital units also suffer from slight screen refresh latency. This tiny delay can hinder fast-paced movement or driving.
Analog devices use passive light amplification. Photons enter a photocathode, converting light into electrons. These electrons multiply through a microchannel plate (MCP). Finally, they hit a phosphor screen, creating the glowing image you see.
You must understand that the outer shell (the housing) and the image intensifier (the tube) are distinct components. You can put an elite tube inside a basic housing, or vice versa.
Generation 1: Skip this entirely. It is obsolete, bulky, and relies too heavily on IR light.
Generation 2: This generation offers solid performance for civilian and law enforcement use. It represents the best value for serious beginners.
Generation 3: This remains the restricted military standard. It features incredible light amplification and tube longevity, but comes with a steep price tag.
Phosphor screens come in two main colors. Green Phosphor emits light at 555nm. The human eye is highly sensitive to this specific wavelength, which reduces visual fatigue during extended use. White Phosphor offers higher contrast and more natural shadow gradients. It feels closer to watching a black-and-white movie. However, White Phosphor carries a heavy price premium.
Feature | Digital (CMOS) | Analog (Gen 2 / Gen 3) |
|---|---|---|
Price Range | $150 - $800 | $2,000 - $10,000+ |
Daylight Safe | Yes | No (can cause permanent tube burn) |
Latency | Slight delay (refresh rate limited) | Zero latency (instantaneous light speed) |
IR Reliance | Heavy reliance in pitch black | Excellent passive performance |
You must set realistic expectations based on your budget. Technology scales dramatically with price. Reading through various Night Vision Device Buying Guides will show you that expecting $5,000 performance from a $200 unit guarantees disappointment.
This tier is strictly digital. It is best suited for wildlife observation, camping trips, and casual airsoft games. Your evaluation criteria here should focus heavily on practicality. Demand a unit with an internal rechargeable battery. Avoid older models requiring eight AA batteries, as they become far too heavy. Look for proper weatherproofing, demanding at least an IPX6 rating. Ensure it has standard mounting compatibility for tripods or basic helmets.
This is the sweet spot for serious beginners. In this range, you step away from digital latency. This budget buys a high-quality housing, like a mil-spec PVS-14. It will contain a solid Gen 2+ or an entry-level Gen 3 tube. This equipment handles tactical training, night hiking, and professional hunting with zero latency. It requires minimal active IR light, keeping you covert.
This tier represents the high-end ceiling of the market. It includes articulating dual-tube setups and crisp White Phosphor Gen 3 tubes. At the absolute top end, you find hybrid technology like a Helmet-Mounted Thermal Fusion Monocular Goggle. These devices overlay a thermal heat signature onto the traditional night vision image. We mention this tier to set a realistic ceiling. It illustrates exactly what professional operators pay for edge-case performance.
Many beginners make a critical budgeting error. They spend all their money on the optical unit and forget the accessories. The device itself is only half of the system. You must build a complete gear ecosystem to use it effectively.
The device needs a stable platform. You cannot simply strap it to your bare head comfortably. Buyers must budget for a quality helmet. You can choose a lightweight bump helmet for basic impact protection. If you need ballistic protection, budget for a Kevlar helmet. Ensure the helmet comes equipped with a standardized metal front shroud to accept mounts.
You need a physical linkage between the helmet shroud and the goggle. This usually involves a lowering arm and a J-Arm adapter. Buying these components brand new from boutique tactical brands costs hundreds of dollars.
Cost-saving tip: Source military-surplus mounts on the secondary market. A standard USGI Rhino mount paired with a basic J-Arm provides exceptional durability for a fraction of the cost.
Counterweights are absolutely essential for ergonomics. Night vision optics pull your head forward. Without a rear helmet counterweight or a heavy battery pack, severe neck fatigue sets in within 30 minutes. You must balance the weight evenly across your skull to prevent headaches and long-term strain.
If you plan to use your gear for hunting or shooting sports, remember that traditional rifle optics do not work well through tubes. You cannot easily press a tube against a rifle scope. Active shooters and hunters must adopt infrared aiming lasers. You wear your optic, look past the weapon, and point-and-shoot using the invisible IR laser beam.
The secondary market is full of incredible deals, but it also hides scammers. You must protect your investment by verifying claims before sending any money.
Analog tubes are rarely perfect. Manufacturing processes often leave tiny dark spots known as blemishes. Buyers must demand recent, timestamped "through-the-tube" photos. Check for dark spots, laser burn-ins, or edge shading. The viewing area is divided into three concentric zones. A small blemish in Zone 3 (the outer edge) is acceptable. A massive black spot in Zone 1 (the dead center) ruins the user experience. Always verify the tube's condition visually.
Beware of cheap plastic clones mimicking military housings. Scammers frequently mislabel these to confuse beginners. A counterfeit PVS-14 housing might look authentic, but it lacks proper nitrogen purging. Without nitrogen, the internal lenses will fog up rapidly in humid environments. Fake housings also lack actual waterproofing, ruining expensive tubes during the first rainstorm.
Some digital brands drastically exaggerate their detection ranges. They might claim a 500-yard viewing distance. In reality, that distance only applies if you use a massive, separate IR floodlight. You should also understand that in absolute, zero-ambient-light environments (like a sealed cave or thick basement), even top-tier passive analog tubes require supplemental IR illumination to function. Do not fall for impossible physics claims.
Making your first purchase does not have to be intimidating if you follow a logical progression. Your primary use case dictates your technology choice. If your budget is strictly under $500, start with a modern, lithium-powered digital monocular. It provides excellent recreational value.
However, if you intend to engage in serious tactical training, nighttime driving, or dynamic hunting, bypass the cheap gear. Save your funds for a quality Gen 2+ or Gen 3 analog monocular. Before clicking buy, always calculate your total system budget. Factor in the helmet, the mount, and the counterweights. Assess whether you need a static observation tool or a dynamic movement system. Making these calculations early ensures your gear serves you reliably for years to come.
A: Traditional analog screens use green phosphor because the human eye is most sensitive to green light, specifically at the 555-nanometer wavelength. This heightened sensitivity allows you to perceive sharper details and subtle contrast changes without straining your eyes. Green light significantly reduces visual fatigue during extended operations compared to harsh white or red light.
A: No. Analog tubes require ambient light, like moonlight or starlight, to amplify. In pitch-black environments with zero ambient light, passive tubes cannot see anything. You must use an active infrared (IR) illuminator to cast invisible light into the environment, or switch to thermal imaging, which detects heat instead of light.
A: You must use sacrificial lenses. These are cheap, specialized polycarbonate shields that thread directly over your expensive objective lenses. If a fast-moving BB or paintball strikes your face, it shatters the $20 sacrificial lens instead of destroying the fragile glass of your optical device.


